This ease-of-use and immediate-feedback are mostly provided through a graphical user interface (GUI) which is based on Motif. It is especially easy to make changes to individual elements in the lattice and then see what happens with a minimum of typing input files and reading output files. In fact, after the initial input file is made, most of the input consists of clicking with a mouse on options, and most of the output is either automatically displayed or available by clicking with the mouse.
The second important feature of Xorbit is its Channel Access capability. This feature was originally implemented to simulate the way the Advanced Photon Source (APS) control system accesses (or will access) the devices in the APS rings and beam lines over the Ethernet, so that Xorbit could be used as a simulation for those devices to test control algorithms and procedures. The mechanism, using Unix Interprocess Communication (IPC), by which Xorbit mimics Channel Access turns out to also provide a powerful means of connecting programs, such as Mathematica[1], or spreadsheets like Excel[2] to the orbit calculations in Xorbit. It is felt that the ability to easily use such powerful programs, which contain a multitude of flexible tools, is perhaps a better approach than providing specialized (and to some extent inflexible) tools in the program itself. It is possible, in this case, to keep the orbit code small and clean, and to leave the development of mathematical tools to companies who can afford to spend more time developing and refining them. These tools also have the advantage that many people are already familiar with them and use them.
Xorbit is not necessarily a replacement for large, well-established, accelerator codes such as Mad[3]. It is, however, an accelerator code that provides good visual feedback and which can tap the capabilities of existing mathematical analysis programs to provide even more power than conventional codes in a flexible way. It can be effectively used alongside codes like Mad. Xorbit is an accelerator code for the '90's.
Xorbit is written with a combination of Fortran and C. The physics is mostly Fortran, and the interface is mostly C. The code has been developed on Sun workstations and should work well in that environment. It has been used with the Motif window manager, Mwm, and with the X Windows window manager, Twm, as well as with the Open Windows window manager, Olwm. Because it is an X-Windows code, it can be run on one platform, and the graphical results can be displayed on any terminal or computer that has an X server. The mixed-language programming and the use of IPC, which is not implemented in a standard way, may make porting the code to other platforms difficult, however.
The lattice is specified in an input file. There are means provided to convert Mad input to that used by Xorbit and back. In the interactive mode the remaining input is through the interface. Xorbit can also be operated as a program that reads the input file and produces several output files without the interface and without further user intervention.
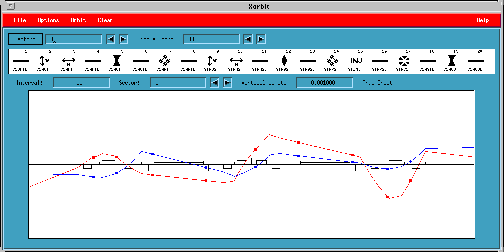
Fig. 1. The Xorbit Main Window.
The Icon Area contains icons for each of the elements in the lattice. Both the index of the element in the lattice and its name are shown. The display can be scrolled in several ways. If an element is clicked with Button 1 in the Graph Area, the icon for that element will appear at the middle of the Icon Area display. This is the easiest way to pick icons.
The main reason for the Icon Area is that if you click on an icon in the Icon Area, a dialog box like that shown in Fig. 2 will pop up giving information about that element. This information is current at the time the icon is clicked and will not be updated. Clicking at a later time on the icon for the same element will display another box with the then-current information. A fairly large number of boxes can be displayed at once. They can be dragged around the screen and placed as desired. They can be used as a means of keeping track of parameters as changes are made in the orbit. In addition, the items that appear in text boxes can be changed, and this is the primary means of changing lattice parameters via the interface. In the Element Information dialog box the quantities A and B typically represent the element's normal and skew strengths, respectively. The meaning of these quantities varies somewhat depending on the type of element, however.
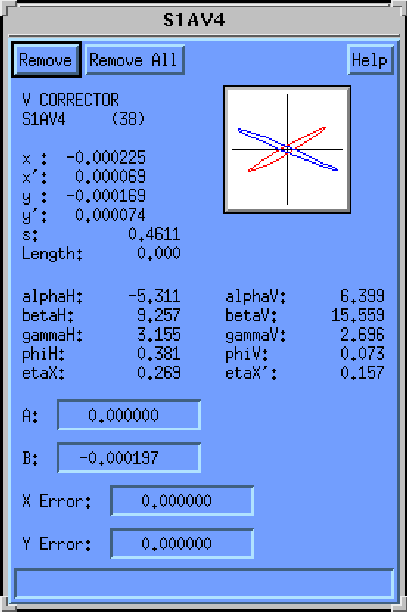
Fig. 2. The Element Information dialog box.
The Graph Area contains the orbit display. The horizontal axis is s, the longitudinal distance along the lattice, and the vertical axis is x or y, the transverse coordinates. Exactly what is displayed can be controlled via the Orbit Options item in the Options pull-down menu, and the area can be cleared via items in the Clear pull-down menu. In addition to the menus, there are controls in the graph control area to size and scroll the display, and there are mouse operations.
There are three operations that can be performed with the mouse in the Graph Area.
1. Clicking Button 1 moves the icon for the element at the mouse pointer to the middle of the Icon Area, where it can be clicked to display information about the element.
2. Clicking Button 2 moves the position which is at the mouse pointer to the center of the Graph Area. The Graph Area display can be scrolled discontinuously by repeatedly clicking Button 2.
3. Pressing and holding Button 3 scrolls the lattice continuously. The speed depends on how far you are from the center, and the direction depends on which side of center.
There are a number of options to control just what is displayed in the Graph Area. These are available through the Orbit Options dialog box actuated from the Options Menu. They include which coordinates to display, whether to display symbols for beam position monitors (BPM's) and element displacements, whether to show the orbit at all elements or only at BPM's, the initial values (x0, x'0, y0,y'0) for the orbit, and the number of orbit turns. In addition, there are many menu options, which are summarized below.
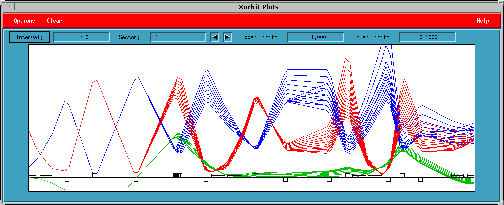
Fig.3. The Xorbit Plot Window. The fourth quadrupole has been moved and the sixth changed.
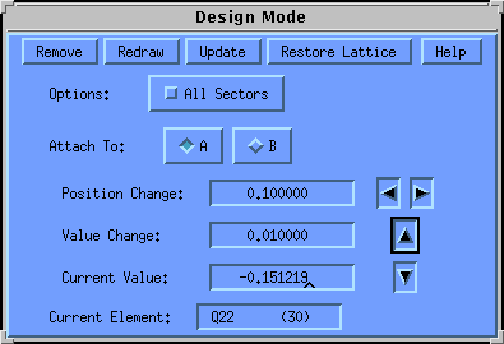
Fig. 4. Design Mode dialog box.
The real advantage of the Plot Window is that there is a Design Mode that allows the element strengths and positions to be changed by clicking with the mouse or by entering values in a text box. The plots in the Plot Window change as the elements are changed, allowing immediate visual feedback of the results of the changes on any of the above parameters. The Design Mode is controlled by the Design Mode dialog box, shown in Fig. 4. An element is selected the same as it is selected for the Icon Area, most conveniently by clicking on it in the Plot Graph Area.. The up and down arrows increment the chosen element's normal (A) strength or its skew (B) strength. The left and right arrows move the element sideways. Normally, each new set of curves is displayed along with the previous ones as the chosen element is changed. The graph can be redrawn with the latest curves only, and the lattice can be restored to its original values. It is easier to do than to explain.
File Menu
The File Menu contains operations for saving and restoring lattice files and files with other orbit information, as well as the Quit button.
Options Menu
The plot window is initiated from this menu. A dialog box with the tunes can be displayed, and the lattice can be restored to its original values. Displacements and correctors can be saved, restored, and zeroed, and new random numbers for displacements can be calculated. A variety of plots, including the Twiss parameters, x, x', y, y', and the horizontal and vertical corrector settings, can be displayed and manipulated using Xvgr[4], a public-domain, X-Windows plotting program. An XTerm window can be started, and programs such as Mathematica can be started to access Xorbit.
Orbit Menu
A dialog box with the orbit options can be popped up from the Orbit Menu. The orbit can be started and continued for a number of turns (chosen in the Orbit Options dialog box). A new closed orbit can be calculated. A dialog box with orbit statistics (average, rms, and maximum values for the orbit, the correctors, and the displacements) can be displayed. Several (currently five) orbits can be saved and later displayed. It is also possible to display difference orbits with respect to any one of the saved orbits. Several correction schemes can be applied.
Clear Menu
The graph area can be cleared, updated with the current orbit, or redrawn with the current orbit only. On startup all new orbits are drawn without clearing the old ones. This can be changed to clear the graph area before the orbit is plotted.
Help Menu
Xorbit has a hypertext Help package, HyperHelp[5], which is a stand-alone Motif application developed by Bristol Technologies. It is very similar to the help provided in Microsoft Windows. The HyperHelp viewer is necessary to utilize this Xorbit feature, but it may be distributed with Xorbit, along with the Xorbit help file. The help compiler, which is necessary to make the Xorbit help file in the first place may not. Figure 5 shows the viewer positioned at the contents screen, one of over 30 screens of Xorbit help. The menu items allow bringing up HyperHelp with the contents screen, the overview screen, or screens with help on HyperHelp itself. The user can subsequently jump to other places by clicking with the mouse or by using the search or browse modes. In addition, dialog boxes which do not rely on HyperHelp can be displayed with a help summary and version information.
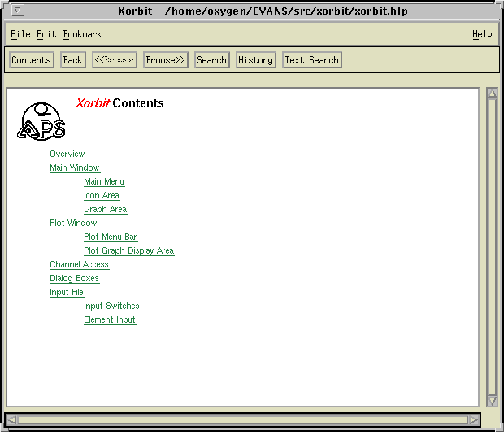
Fig. 5. The Help Window. You can jump to the underlined topics by clicking on them.
Plot Window Option Menu
The Option Menu in the Plot Window can be used to bring up a dialog box which can be used to change what is plotted in the plot window, how each plot is scaled, and what colors are used. The Design Mode dialog box, described above, is initiated from this menu. There are also Remove and Quit buttons to remove the Plot Window and quit Xorbit, respectively.
Channel-access interfaces developed at APS to such programs as Mathematica, Devtest[7], WingZ[8], and Excel work in just the same way with Xorbit as they do with the real machine. The only necessary change is that they need to be linked with the Xorbit Channel Access routines rather than the Epics Channel Access routines. The Xorbit routines have the same names and arguments and, in fact, use the same header file, cadef.h.
Apart from emulating the real Channel Access, these routines provide a powerful and easily modified way to perform complex procedures, such as orbit correction, on the lattice in Xorbit. They also make the extensive features, such as plotting or matrix manipulation, in programs like Mathematica available for analyzing orbit dynamics.
Devices are read or set via their process variable names. The process variable names used in Xorbit are of the form:
elementname.variable
elementname is the full name of the element in Xorbit, e.g., S34AQ1. The possible values for variable include most of the element and orbit parameters in Xorbit, including variables such as the tunes and Twiss parameters.
To read the x displacement of S34AQ1 one would use the process variable name S34AQ1.xerr, and to set the strength of horizontal corrector S1AH2 to, say, 0.1 mrad, one would use the process variable name S1AH2.a. In Mathematica, for example, this might be done by
xdisp=CaGet["S34AQ1.xerr"]
and
newstrength=CaSet["S1AH2.a",.0001],
respectively. A Mathematica procedure to measure a response matrix is shown in Fig. 6. This procedure simulates a real-life accelerator operation. One could, in addition, use the sophisticated graphics and matrix routines in Mathematica to, say, invert the response matrix, plot corrector strengths or monitor readings, etc. In general, one has access to all the orbit information in Xorbit and can read it, change it, or use it.
In a spreadsheet Channel Access might be done by selecting the cell or cells with the desired name or names and indicating the cells for the input and output values before running an appropriate macro. An example of using Excel is shown in Fig. 7. This Excel is running on a PC and is communicating over the Ethernet to the workstation on which Xorbit is running.
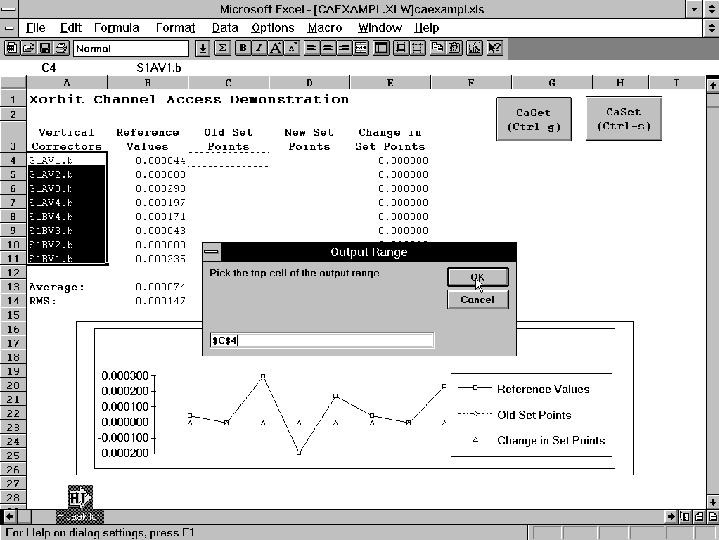
Fig. 7. Xorbit Channel Access from Excel. The device names have been selected, and the CaGet macro has been started by clicking on the button or by typing Ctrl-g. There is a dialog box prompting for the start of the output range, which has been chosen to be where the dotted box is. After the OK button is clicked, the current settings will be placed in the output range, and the spreadsheet, including the plot, will be updated.